The Dragon Book

(dragon book)
For my Wife's haunt this year, we decided to do a witches library. She haunts inside, I haunt outside. I thought every witches library ought to have a dragon bestiary, so I built the book, "Dragons and their Kin". Since it is a dragon book, I thought it should be bound in dragon hide. It's only natural.
I have about 8 hours into this book. Here's how I did it.
Step 1: Design
All good props begin with good design before hand. Preplanning helps avoid accidents, happy or otherwise. Good design helps you predict the outcome. Don't rely on serendipity to have good results. Resolve as many problems as possible on paper before you ever committ to the build. It will save you time and money. I don't like happy accidents.
Step 2: Tools and Materials
Tools:
Scissors
X-acto Knife
Cutting Board
Hot Glue Gun
2" Chip Brush (59 cents at Wal-Mart)
Broken Hair Comb
Ruler
Pencil
Sharpie Pen
Painter's Masking Tape
Crumpled up Paper Towels
Very fine point Artist's Paint Brush
Larger Paint Brush for burnishing metal leaf
Ink Pen (black)
Materials
Large Thrift Store Book with good binding
Scrap of Illustration Board
Sobo or other flexible craft glue
Sticky Back Craft Foam
Hot Glue Sticks
Jaxsan 600 or ViCryl, or other vinyl or acrylic or latex mastic. (can be bought at paint store)
Two semi contrasting colors of green spray paint. (I prefer Design Master, but it's about $8 a can)
One can of Design Master "Glossy Wood Tone" Floral Spray Paint (CRITICAL)
Jar of Metal Leaf Adhesive
Metal Leaf (for this book I chose copper)
Dark Brown Latex or Acrylic Paint
Flat Sealer
Gold Spray Paint

(a cheap thrift store book with good binding)
Click on the already large pictures for even larger ones!
Step 3: Application
First cut out and apply the title blocks for the front cover and the spine out of illustration board. It's important to do this because it needs to be raised to compete with the craft foam.
Apply the title block to the front cover, and one on the spine of the book with Sobo or other flexible craft glue. Completely coat the illustration board with the glue, position it where you wish it and put weights on it until it dries. It takes about an hour, give or take for the glue to be dry enough to work with.
Begin cutting and preparing the Craft Foam
First cut the foam into 2" strips, and then notch them every 1 to 1 1/2 inches with the scissors.
Shape each scale with the scissors so they look unique and ragged. (I wanted this to look like it came from an old battle scarred dragon.)
With the point of an X-acto knife scratch the edges of the scales until they are jagged. (see picture below)
Remove the paper backing and apply the craft foam to the bottom of the book.
You can notch the bottom of the book where the cover shows through the gaps in the scales. It's the little details like that that will make the book credible.
Continue to add strips of foam until the book is covered. Offset the rows so the scales "shingle".
It will be necessary to piece around the title block.
There are places, especially around the spine and the edges of the book where you will need to hot-glue the foam into place. Some of the scales may lift off, so a little dab of hot glue will make the difference there.

(foam cut and shaped)

(foam and illustration board applied, bottom of book notched)

(foam completed, note the half scales across the top)
Step 4: Trim
Trim around the title block with some fabric trim. (I used gimp)
If you put a title block on the spine (and you should have) trim around that also.

(trimming the title block with gimp and hot glue)
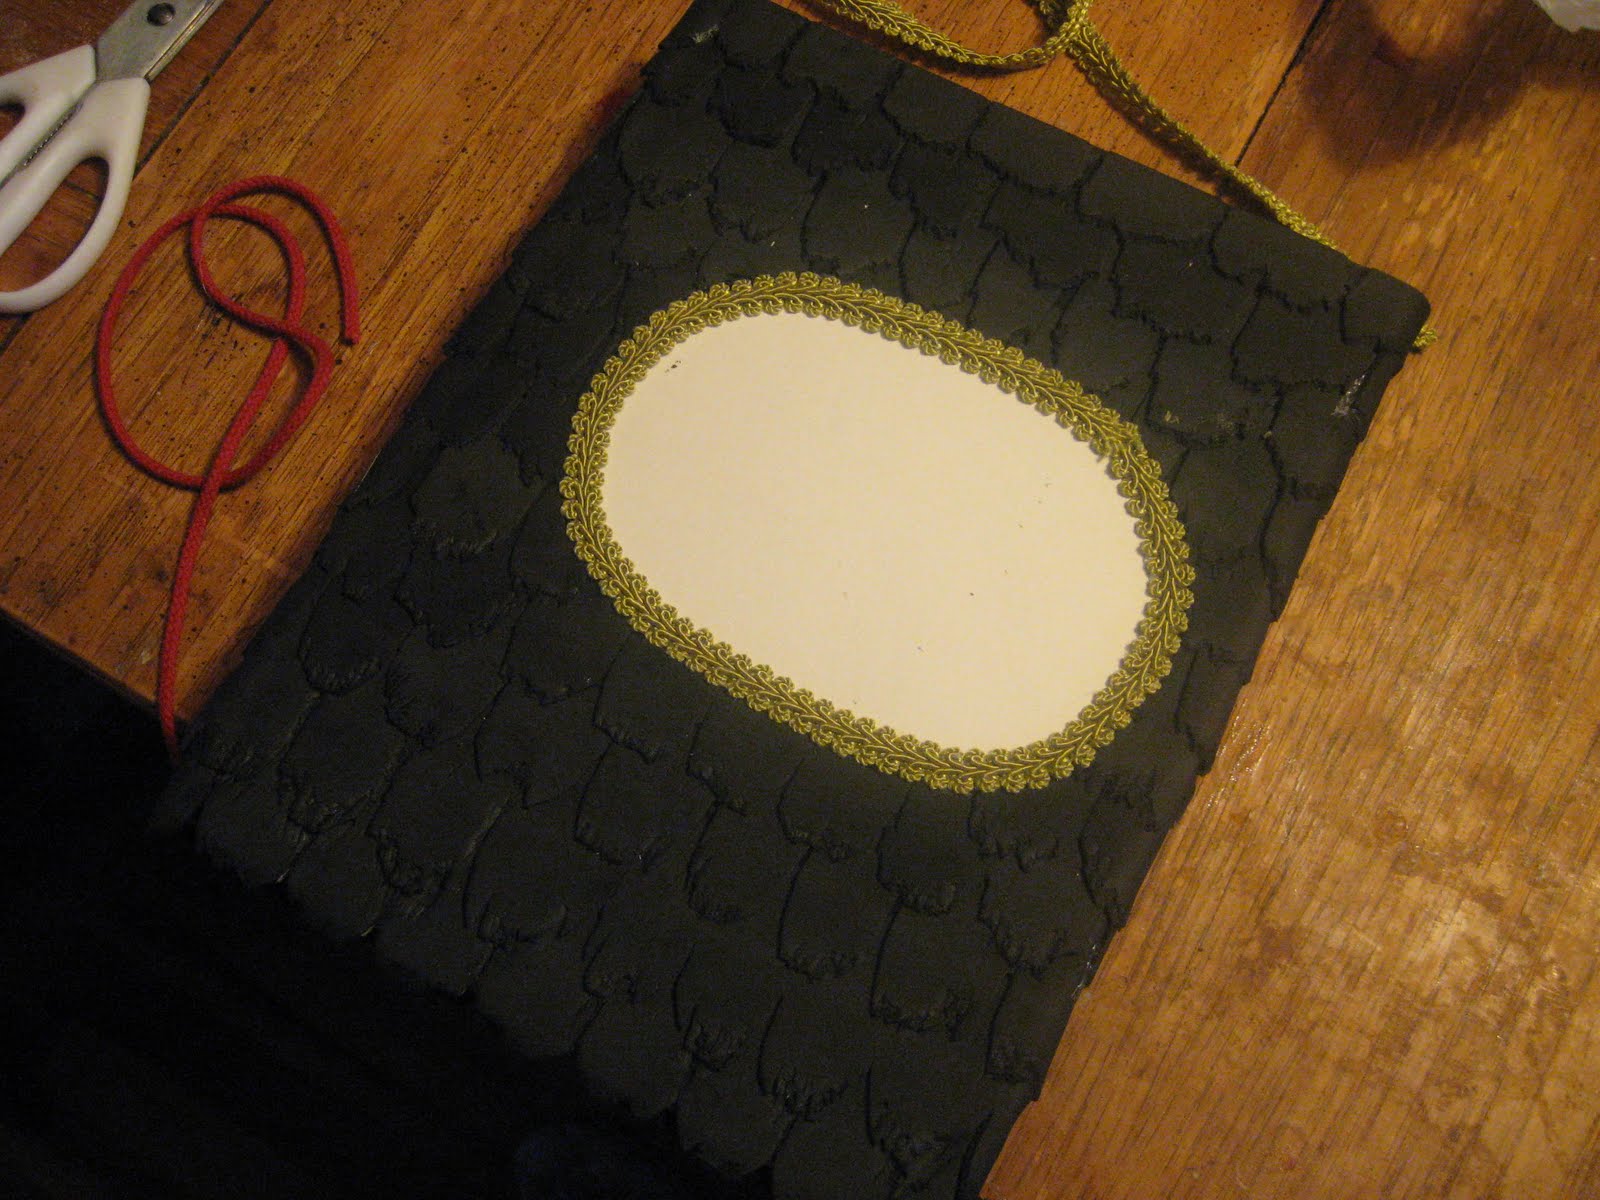
(title block trim finished)
Step 5: Substrate
This is one of the most important steps of all. It will give you a uniform surface to paint on and may be the difference between a successful project and a so-so one. DO NOT SKIP THIS STEP.
Brush on the substrate of your choice. (I prefer Jaxsan 600 or ViCryl, but any latex or acrylic mastic will work. I don't use latex carpet adhesive because of the fumes and extremely long dry time)
Brush the substrate on the title block in a cross hatch pattern and straight up and down on the scales.
Use the large end of a man's hair comb and drag through the mastic while it's still wet and then soften with the paint brush.

(painting on the substrate)

(substrate finished)
Step 6: Pre-Lettering
Theoretically you already have a title for your book. Select a font that is appropriate for that book and lay out the type with pencil.
Use light lines for the top and bottom and the tops of the shorter lower case letters. Basically a top, middle and bottom. Create a center line.
Count the letters in your line and find the center. If your title was "Madagascar", it has ten letters so your center line would be between the G and the third A. You may need to fudge because the M is slightly bigger.
Start in the center and then work your way out both ways.
Start in pencil and then fill in with a Sharpie pen.

(lettering layout with Sharpie pen)
Step 7: Painting
Tape off the title block with painter's tape.
Spray two colors of green over the surface of the book. It should look mottled or "scumbled" when you are done.
Allow to dry.
Spray a portion of the book with Design Master Glossy Wood Tone and immediately start daubing it up with a crumpled paper towel. This will give the appearance of leather.
Spray and daub until the entire surface of the book has been coated and it has reached the desired value.
Be careful not to completely obscure the lettering. It needs to show through this layer.

(two colors of green blended on book surface)
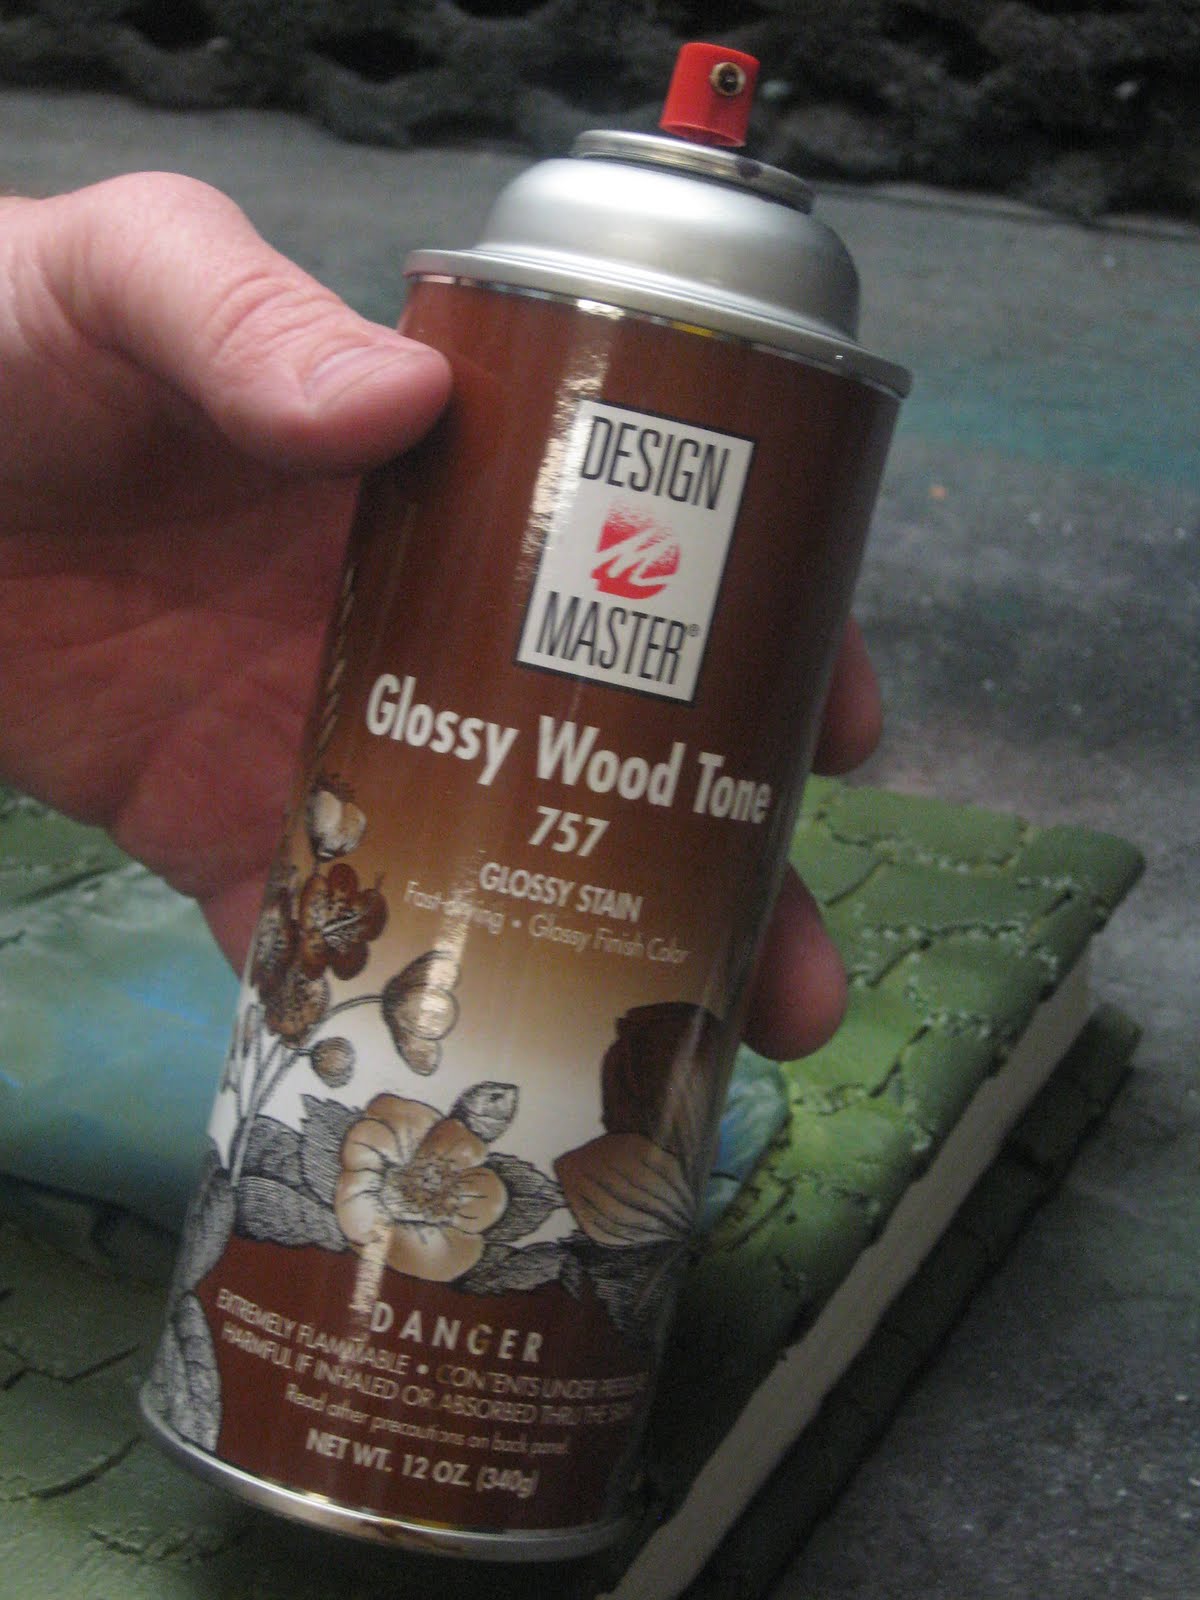
(if I could only have one color of spray paint in my paint kit, it would be Design Master: Glossy Wood Tone. It is a transparent brown color that allows the original colors to show through and it flows before it dries unlike regular spray paint that practically is dry by the time it hits the surface)

(spray and daub, simultaneous action. Careful not to get it on your hands, spray paint is toxic)
(sprayed and daubed)
Step 8: Lettering Revisited
Using metal leaf adhesive and a fine point brush, paint the lettering from the previous step.
This should be a thin coat. You gain nothing by globbing it on.
Allow to dry completely. Metal leaf adhesive has an open time of about an hour, meaning you can work it for up to an hour after applying.
Apply metal leaf by laying it over the prepared area and pressing it into the adhesive with a large soft but firm brush.
Once the leaf is pressed into the adhesive you can get fairly rough with it as you push the excess away. In fact you will need to get rough with it to clear the leaf out of the cracks and recesses in your letters.
Use the large brush to burnish the metal leaf.
Once the metal leaf is in place and burnished, ink around the edges of the letters with a small Sharpie pen or a black ink pen. This helps the words pop.

(applying the metal leaf adhesive)

(pressing the copper leaf into the adhesive)

(revealing the letters through burnishing)
Step 9: Schmutzing and final detail (unfortunately I don't have pictures of this step. I left my camera at home. Sorry)
At this point, the book is almost complete. The problem now, is that it is too shiny. The glare needs to be taken down a bit. We do this by schmutzing.
Take down the shine from the metal leaf by over spraying with a little Glossy Wood Tone. Not too much, just enough to make the metal leaf live in the same world as the rest of the book.
Use some dark brown oops paint and a chip brush and paint haphazardly all over the book; front, back and spine.
Immediately rinse off the brush in a pail of water and apply water to the book causing the paint you just applied to run and coat the book.
Allow a few places in cracks and crevices to remain painted, but overall it should just be a wash or a glaze.
Dry with a hair dryer or just allow to air dry. (I like the hair dryer because I'm impatient)
Cover the entire book with a flat sealer. (probably not necessary, but I like the way it feels better than the oops paint wash)
Open the book's covers, front and back and hold the pages together. Gently bend them one way and spray the edges with gold spray paint.
Bend them the other way and spray gold from the other side. This will make the gold edge paper very rich.
Do the same thing for the top and bottom of the pages.
You are finished.
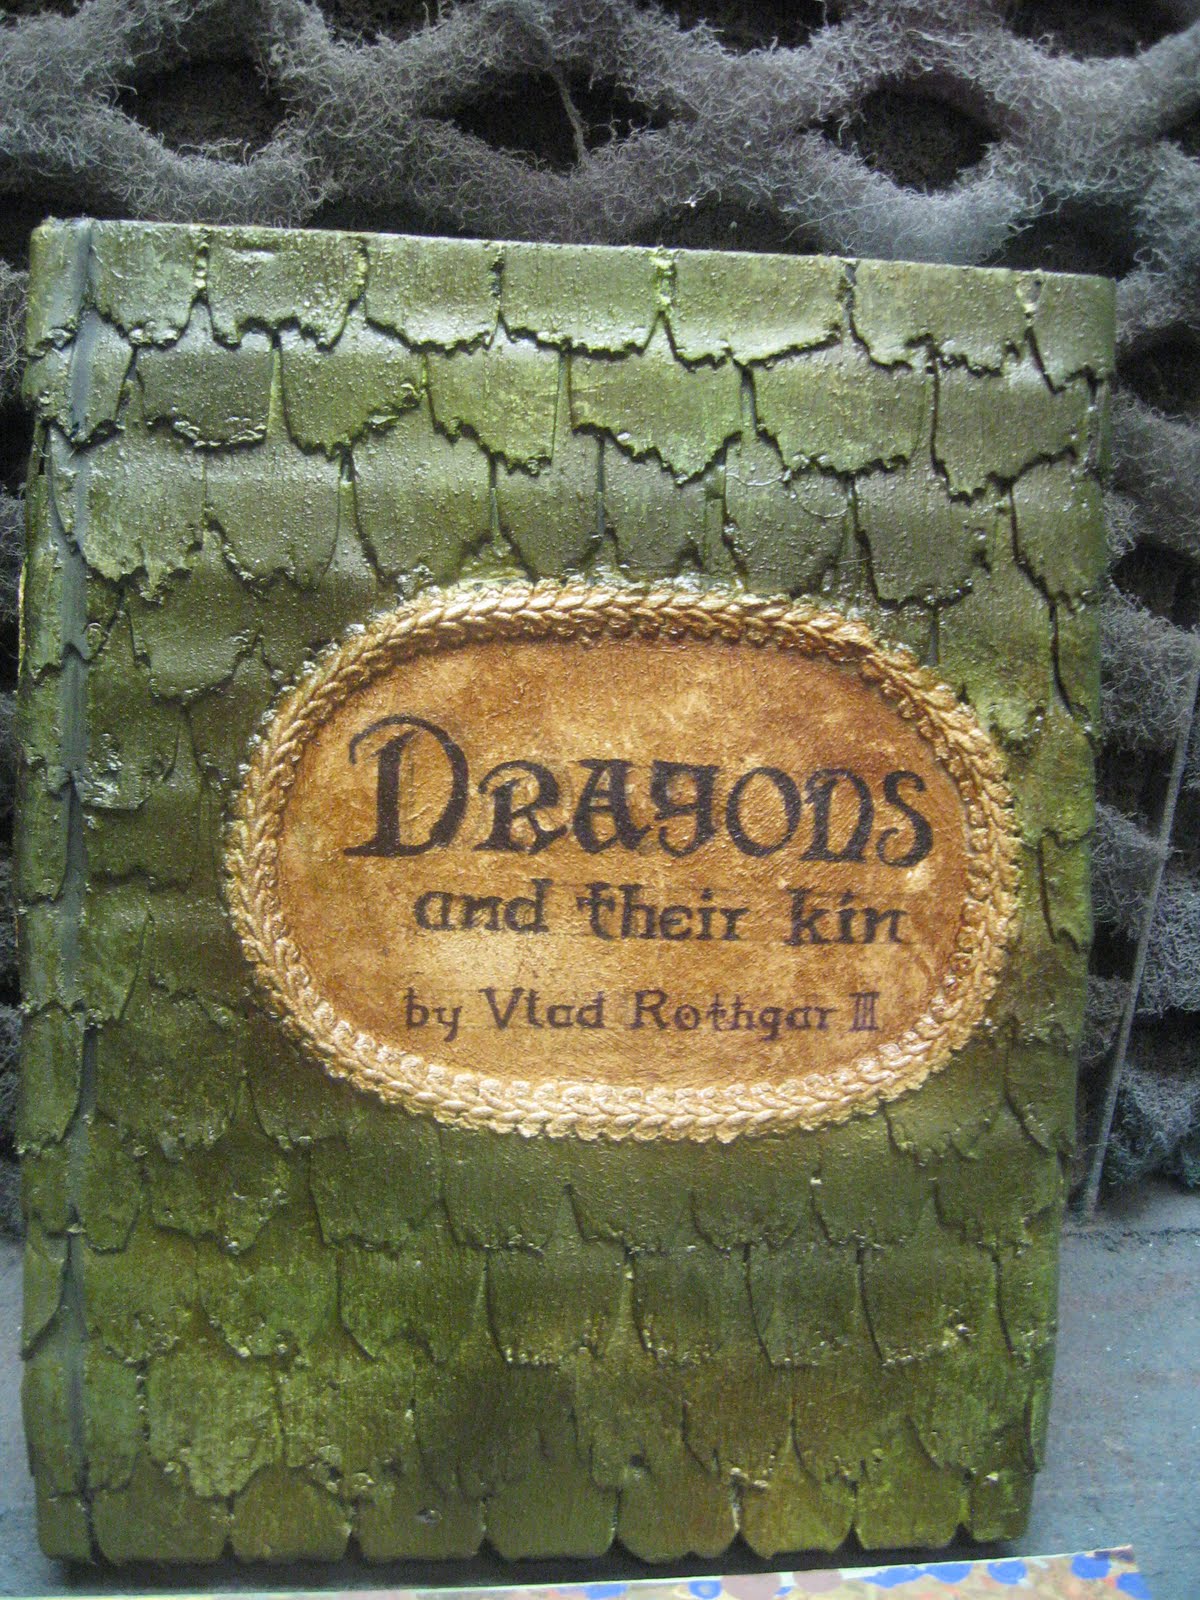
(the completed book)
5 comments:
This is really awesome! I love the look and concept!!
FANTASTIC! Thanks so much for the tutorial.
Thank you. I spent some time on your blog today. You have a lovely blog.
I'm just slightly confused as to what exactly the substrate is. Seems like an extremely useful step, after google-foo'ing the two mentioned, but I'm still unclear as to what it is...
Did you pull out the old pages?
Post a Comment