Friday, July 13, 2012

How I Spent my Summer, 2012 Part I--Travelogue: July 4th Cave Falls

Cave Falls, Yellowstone National Park

I have lived more than thirty years of my life near the southwest corner of Yellowstone National Park, and this year is the first time I have ever visited Cave Falls.  Yellowstone is home to many great things, animals, geysers, mountains, lakes, rivers and over 300 waterfalls.  For the last several years, we have been on a pilgrimage to see as many of Yellowstone's waterfalls as we can.  We only had a few hours on July 4th so we decided to visit Cave Falls.  We were not disappointed.

The southwest corner of Yellowstone is sometimes referred to as "Cascade Corner", because some of the most spectacular waterfalls in the park are situated there.  This part of the park is visited less than other areas because almost all of it is backcountry and only accessable by hiking.  Most of the hikes are long but the trade off is that they are mostly level with little elevation gain.  Last summer I hiked with my son Haydn to Union Falls in the southwest corner and blogged about it here

To get to Cave Falls from where we live, we headed north on Highway 20 and turned east on Highway 47 which is now designated as "Mesa Falls, Scenic Byway".  Just before the road dips down into the canyon for Warm River, there is a turnoff to Cave Falls to the right.  From there it's about 18 miles to the falls.  The road to Cave Falls terminates at the falls.  We discovered that Cave Falls is really a waterfall flanked by cascades.  There is one set of cascades about a hundred yards downstream from Cave Falls and another one about thirty yards upstream.

The cascades before the falls

The brink of the cascades before the falls

Cave Falls only drops about 20 feet, but at 250 feet wide, it is the widest of all of Yellowstone's waterfalls.  It was quite impressive and there was still alot of water flowing over it.  Cave Falls was so named because there was a large rock overhang about a hundred yards long that flanked the river.  Part of the overhang actually went deeper into the hillside and part went under the waterfall.  Unfortunately, the overhang collapsed in 2008, so there is no cave at Cave Falls any longer.  Even without the cave, though it is an impressive sight.

  We walked down the short trail from the parking area to the falls and ran into some friends from home.  It was nice to see familiar faces there.  While we were there, I think there was a bug hatch going on because the water was boiling with trout jumping just below the falls.  It's always fun to witness that.

Friends from home

Cave Falls and the cascades above the falls

We discovered that there was another waterfall upstream from Cave Falls about a mile and a half called Bechler Falls.  Of course we hiked that.  We did discover that we should have brought bug repellent on the trip with us, however because whatever bugs were feeding the trout were feeding on us.  That being said, though the trail was very pleasant and shaded most of the way.  at the trailhead there were a series of wooden steps up a steeper portion of the trail.  After that, the going was mostly level with only an occaisional, gentle elevation gain. 

Mountain ash branch in sunlight at the trailhead

Wooden stairs at the trailhead

The trail flanked the river for all but the last sixty yards or so where it cut through the forest to navigate around a small promontory.  Here and there, cascades and rapids were visible along the trail.  The forest was mainly lodgpole pine with a few fir trees to keep them company.  Wildflowers were also on display.

Cascades along the trail

Aspen shadow on trail

Lodgepole forest

The trail passes by the confluence of the Warm River and the Bechler River, and continues following along the Bechler to the falls.  From Cave Falls to Bechler Falls, the river seems to be one series of cascades after another.  About two hundred yards away from the falls, I began hearing the rumbling of tumbling water.  I pointed it out to my sons.

Confluence of the Warm and Bechler Rivers

Very cool rock along the trail

Bechler Falls

Mossy rock at the base of the Bechler Falls

Haydn and I hiked upstream for another fifty yards or so while Chimene and the two younger boys started hiking back to the car.  Above the falls, the river looked like it was made of glass.  Beautiful and still.  It is here that the famous Bechler Meadows begin.  This is truly a beautiful part of Yellowstone National Park.

The Bechler River above the falls

Pretty yellow wildflower along the trail

More wildflowers

Still more wildflowers

Red wildflowers

This hike is short, about 3 miles roundtrip and very easy.  Very little elevation gain and where the trail does rise it's a gentle slope.  The scenery is beautiful and because of the shade and the proximity to the river, it tends to feel a little cooler than the outside temperature.  Make sure you bring bug repellent.  I would definitely hike this trail again.

Monday, July 9, 2012

How I Spent My Spring--Travelogue: Part V Mesa Falls

Me and the Hot Chick overlooking Lower Mesa Falls

On June 16th, the theatre department held a retirement party for Susan Whitfield up in West Yellowstone, Montana.  Susan has been the costume designer and a faculty member at Ricks College and Brigham Young University-Idaho for forty-one years.  She has been a mentor, a friend, a colleague and an inspiration to me.  We honored her with an exhibit in the Spori Gallery this semester.  I blogged about it and you can read about it Here.

Chimene and I decided to leave a little early and take the scenic route up to West Yellowstone, via the Mesa Falls Scenic Byway.  Mesa Falls is a two waterfall system on the Henry's Fork of the Snake River.  They are both very beautiful and well worth the visit.  The byway begins in the town of Ashton, Idaho and winds it's way down past Warm River and up the side of the Island Park Caldera.  Along the way there are a few stops that offer beautiful vistas over deep canyons and views of the distant Teton Range.

The Teton Range in the background

Bear Gulch scenic overlook

Along the way, there are several trails that we didn't have time to take, but made note of them for a future excursion.  The next major stop was Lower Mesa Falls.  Lower Mesa Falls drops 65 feet over several tiers through a narrow gorge.  Even from the rim of the canyon, you can hear the thunder of the falls.  Along the canyon wall, there is an area of talus that should be navigable if one wished to climb down.  I may some day to reach the base of the falls trail.

Lower Mesa Falls from the observation area

Talus slope

About a mile upstream from the lower falls is Upper Mesa Falls.  At this parking lot, there is a five dollar day use fee.  Cheap at twice the price.  Five dollars is well worth the price of admission here.  From the parking area there is a paved trail that descends to the brink of the falls and at some point becomes boardwalk.  There are several flights of stairs along this path.  Thick green vegetation is abundant on both sides of the trail and it almost has the feel of a rainforest.

Vegetation along the canyon trail

More vegetation

As you descend into the canyon, every now and then you can see glimpses of the falls.  Upper Mesa Falls drops 114 feet and is 200 feet wide.  This is an impressive falls and not an insignificant amount of water flows over it.  Upper Mesa Falls is also the only major falls on the Snake River that hasn't been co-opted for hydroelectric power or irrigation.  It is pristine and beautiful.

The boardwalk takes you to the brink of the falls, then continues downstream along the canyon wall with frequent overlooks to give entirely different views of the magnificent falls.  The spray from this falls has created a micro climate on the far wall of the canyon, which is very much like a rainforest.

Brink of the falls from the canyon trail

The brink of the falls from the first overlook

Mesa Falls from the second overlook

The Hot Chick at the second overlook

Eroded rock pillar in the canyon, downstream of the falls

Micro climate on the far side of the canyon

Layers of columnar jointed basalt on the canyon wall

There is an historic lodge near the parking lot that is over a hundred years old and has been restored.  It is now a museum and visitor's center.  One of the exhibits is a very unique petting zoo.  They have pelts of many of the animals from the area that were trapped and hunted during the fur trade and they encourage patrons to touch.  It's quite interesting.

The historic lodge

A very odd petting zoo

What could be better than a wall of skulls?

"Y'all come back now, y'hear?"

We ate at an ethnic Spanish restaurant in West Yellowstone.  I can't remember the name, but it is now my favorite restaurant there.  The food was very flavorful and many of the menu items were naturally gluten free.  Not only that, but the price was right.  Very reasonable, affordable in a town that is neither reasonable nor affordable in most cases.  After dinner, we caught a show at The Playmill Theatre, my Dad's old business.  We saw  "The Drowsy Chaperone."  It was a good show and very enjoyable. 

The Playmill Theatre

My Dad often said, "The secret to a happy life is to create beautiful memories."  This was one of those.

Tuesday, June 5, 2012

It's Tomato Time

Heirloom Tomatoes

I've been growing Heriloom Tomatoes for more than a decade now.  I started growing them after I saw a picture in one of my wife's magazines of an heirloom tomato salad.  It looked very interesting and I ordered a seed kit for five varieties.  Every year since, I've grown heirlooms.  Each year, I try to grow a variety or two I've never grown before.  Now I grow between 20 and 26 plants.  In the fall I will can stewed tomatoes and maybe some of Nick's famous spaghetti sauce.  Nick is my son-in-law.

Over the years I have developed a system for growing the tomatoes and I want to share it here.

First, I start growing the tomatoes from seed inside.  Several years ago, my kids gave me a compact, indoor greenhouse for my gardening habit.  The one the kids gave me is about three times bigger than the one pictured in the link.  It has enough shelf space on the top rack for 7 greenhouse trays (which hold eighteen 4" pots).  That was the best gift ever.  Over the years, I have acquired more and more equipment so I can grow more and better crops.

I start the seeds in peat pots with a soilless seed starting mix.  I put the peat pots in greenhouse trays and place the trays on heating mats.  I have trays that have a clear plastic cover which makes them a mini greenhouse.  When the seeds finally sprout, I remove the heat and let them grow until a second set of true leaves appear, then I repot them into 4" pots and put them under grow lights.  I've had the neighbors razz me a bit about the grow lights, wondering exactly what it is I'm growing.  We all have a good chuckle over that.

Sometime in May, I select the best of the tomatoes I have grown and start to plant.  Before you can plant, though you have to harden off the tomatoes by putting them outside for a few hours the first day and increasing the time each day for several days.  Once they are hardened off, the first step is to prepare the garden soil.  I'm not 100% organic, but I'm close.  I like to amend the soil with composted manure every two years or so.  Last year I loaded up the bed of my pickup with about two cubic yards of cow manure and tilled that in.  I till to control weeds that have sprouted and I like to get to them before they set seeds.

Once the soil is prepared, I empty a bag or two of garden manure into my wheelbarrow and spray it with the hose.  Then I mix it to create a thick slurry.  I dig a hole, fill it partway with water and put a shovel full of the manure slurry in the bottom of it and begin to plant.  I plant the tomato right on top of the manure.  This year, for half my tomatoes, I put a trout carcass in the hole with the manure.  I learned that the Native Americans used to fertilize their gardens with fish, so I wanted to try it this year.  I'll report on it come harvest time. 

The hole with water in the bottom

Manure slurry, about as much as I put in the hole

Manure slurry in the hole

Tomato on top of manure slurry

Then I fill in the hole, but I create a depression in the dirt about eighteen inches in diameter.  I build a bit of a dam around the edge of the depression to keep the water in when I hand water.  It is important to hand water tomatoes.  When you use a hose and a sprinkler, it can cause the leaves to get diseased and burned.  Plus if you hand water, you put the water only where you want it which means you aren't watering the weeds.  Whatever time it takes me to hand water, it saves me three or four times the amount of time in weeding.  I'd say that's a fair trade. 

When I have the depression the way I like it, I place two Jobes Tomato Fertilizing Spikes about eight inches away from the stem in opposite directions.  This is the part that isn't organic, by the way.  Tomatoes are heavy feeders, so that's why I used the shovelful of manure slurry, a fish and the spikes.  After the spikes are installed, I add about a three inch layer of last year's grass clippings down in a mulch in the depression.  That does several things, first it insulates the roots, second it keeps the water in the soil and impedes evaporation, and third it provides a weed barrier.  Only the most tenacious weeds grow through the mulch, and they are easy to pull because the mulch causes them to send down shallow roots.  Win Win Win.

Depression gardening (I got rid of the handprints, they aren't important)

Jobe's Tomato Spikes

Fertilizer spikes in ground.  I bury them about an inch deep

Three inches of grass mulch

After the mulch, I place a wall of water around each plant to insulate it during the spring.  A wall of water is a flexible plastic sheath that has individual cells that are filled with water so it can stand up on it's own.  The water cells capture the heat of the sun and keep the plants warm in the cool spring nights.  We can have as much as a 40 degree shift from daytime to nighttime to nighttime temperatures here in Southeast Idaho. 

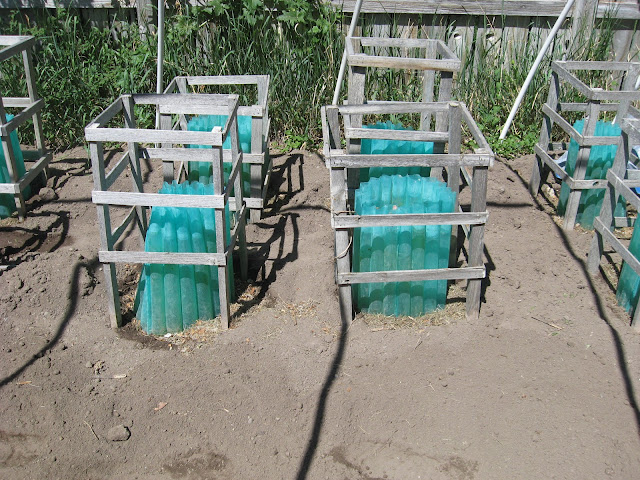
I have a bunch of wooden tomato cages I built with my Dad several years ago.  Once I have the wall of waters around the plants, I hammer the tomato cage around the wall of water.  When the first of July hits, I'll remove the wall of water through the top of the cage which allows the branches and leaves of the tomato plant to fall nicely on the horizontal bars.  I know people who wait to cage the tomatoes after they have removed the wall of water.  My way is better.  Less breakage of branches, less handling of the plant.

Wall of waters

Tomato cages with wall of waters

I drew a diagram of my process.  I have been growing tomatoes like this for several years with quite a bit of success.  I like the depression method because it really conserves water while still being able to generously water the plants.  Enjoy!

Diagram of depression gardening